Showing posts with label Kraftin' Kimmie. Show all posts

Wednesday, September 29, 2010

Kraftin'Kimmie Challenge47


please click images to enlarge them!


Hello again!!
Kraftin' Kimmie's challenge this week is a fun color combo-orange, green & purple- perfect for more Halloweeny crafty goodness! here's the link to read all the details and join in!! i couldn't wait to ink up my new Pumpkin Miles stamp & play! in fact-i just love all the fun, new stamps at Kimmie's store-you gotta go check 'em out and have some stampy fun! YAY!

here's a closeup-these Miles images are so fun to color!
click photo to enlarge:


here's the card deets:
stamps: Kraftin' Kimmie Pumpkin Miles (illustrated by Steven Leary) inside sentiment is from Kraftin' Kimmie's Haunted House
ink: memento tuxedo black
paper: GinaK 80lb. pure luxury white cardstock, colored cardstocks & patterned papers (echo park) are from the awesome Fright Night project pantry kit (from Taylored Expressions)
accessories: copic markers, nesties, cuttlebug embossing folder, black scalloped note card (from an MFT kit, made by The Paper Cut), ribbon & rhinestones (also from the TE Fright Night kit), Jody's awesome boosters
Thanks so much for looking!
{{BIG HUGS}}
-g
^o^

Monday, August 9, 2010

KKSC40- guy birthday card!


click image to enlarge

the Kraftin' Kimmie Stamps blog has a new challenge up to make a guy or a boy birthday card & you still have lots of time to join in!

my sweet hubs LOVES to surf. in Costa Rica a few weeks ago- he spent almost every day surfing! here's a pic before he hit the waves one afternoon in Esterillos Oeste:

so i used the adorable Surfing Miles to make a fun birthday card that will be perfect for him when his birthday rolls back around!

i used my own 'go to' layout so it came together quick & easy. don't be afraid to re-use layouts that you love- it saves time and you'll always like the results!

here's a peek at the inside:

click image to enlarge

deets:
stamps: Kraftin' Kimmie Stamps:
Surfing Miles
, Kimmie's Mermaid Sentiments (inside card),
Kimmie's Beachy Sentiments
(card front)
ink: memento tuxedo black
paper: dk blue bazzill cardstock, ginaK pure luxury cardstock (white, heavy weight) patterned paper by Me & My BIG ideas (destination paradise pad)
accessories: copic markers, nesties, MFT jumbo ric rac die-namic, MFT cork, TCP cut ups-flower buttons die, TCP linen thread (ivory), dimensionals

thanks for looking! hope your week is off to a great start!
{{GIANT HUGS}}
-g
^o^

Thursday, July 29, 2010

KKSC39 (aka solarcaine please!)


the amazing Michele Boyer is hosting at the Kraftin' Kimmie challenge blog-the samples were so fun that i had to play along!

for my card, i used Kraftin' Kimmie's Beach Bum Miles stamp, and i totally HAD to case/scraplift Andrea Murdock's sunburned buns on Miles- so dang cute- i couldn't refuse!!

i adore Kraftin' Kimmie stamps-they are whimsical, fun and just super cool! they make me smile whenever i see one!! i have a few waiting for me to ink them up, but there's TONS more on my wishlist! :)

this one came together very quickly once i picked the main color- blue! i fanned through my patterned paper pad & as soon as i saw the fishy paper, i knew it was 'it'- the reddish-orange fishies perfectly match Miles' sunburn LOL! i also was happy to play with my new wave die from TCP.

i also used a favorite MFT WSCsketch from Frances for inspo on part of this layout (specifically the semi-circles with the bow/button). this sketch totally rocks & i hope you'll try it out too!


if you look close, one little fishy on the front is popped up. he's hiding a water splotch mess. it's blaringly obvious to me, but it taught me that i didn't need to throw it out or freak out or start all over- just try to fix it & move on. my nephew is going to love this funny card anyway ('bum' humor is all the rage when you're 6 LOL) and i doubt he'll even notice my mistake anyway!it even looks worse in the photo than in person. i point this out to remind you to not be so hard on yourself too- mistakes will happen & it's really ok!!

the inside has lots of room to write a note:


deets:
stamps: Kraftin' Kimmie Stamps Beach Bum Miles .
the sentiment is from Kimmie's Beachy Sentiments
ink: memento tuxedo black
paper: mft perfect paper panel, mft cardstocks (snocone, berrylicious), bazzill cardstocks (yosemite blue and a darker blue), patterned paper is from Me & My BIG ideas (the destination paradise pad)
accessories: copic markers, nesties, TCP wave die, TCP divine twine, buttons from MFT summer collection & my stash, dimensionals, glossy accents

thanks for looking! this was fun!
{{GIANT HUGS}}
-g
^o^

Tuesday, June 22, 2010

summertime & the livin's eas(el)y!


please click images to enlarge

hello again friends! hope this finds you well. there's lots of info & pics on this one, so please grab a beverage and hang out a bit!

today i made my first ever easel card. it was prompted & inspired by this adorable creation by Cindy Haffner a few days ago (while you're visiting her blog take some time & enjoy it- there are tons of things to inspire & amaze you!)
from Cindy's blog, i went to check out Beate's amazing reference tutorial on creating easel cards in all sizes.

i just so happened to have some super-cute, new, summery stamps from Kraftin'Kimmie and her blog has a fun color challenge up for this week too (BLUE, YELLOW & TAN)-so i knew it was a perfect opportunity to ink up these cuties & try something new! YAY! of course i used lots of MFT goodies too!

here's supply info:
STAMPS: Florence and her shell accessory, Sandcastle accessory is from the Jack stamp- all from Kraftin' Kimmie-Moonlight Whispers line, sentiments are from Kimmie's Beachy Sentiments set

INK: Memento Tuxedo Black, Memento Rich Cocoa

PAPER: half of an MFT fossil notecard, MFT perfect paper panels, MFT cardstocks (banana split & berrylicious), Bazzill kraft cardstock.

ACCESSORIES: MFT die-namics (jumbo scallop), MFT cork, copic markers, heavy twine, MFT earth girl wooden button, misc. beachy charms from my stash, Fiskar's threading water punch, hot glue gun (to ensure button will never fall off), dimensionals, 1/2" scor-tape

THE DEETS:
1. prep:
i stamped Florence, her shell and the sandcastle images onto MFT paper panels in black ink. The images were colored with copic markers & cut out.
i stamped some additional shells in cocoa ink on a scrap strip of kraft cardstock.
per Beate's awesome instructions, i made a horizontal, standard card sized easel base (5.5"x8.5" cardstock piece scored at 4.25" and 6.375" longways)

2. main panel:
i took half of an MFT fossil, scalloped notecard and used it as my front panel base. i added a blue mat, and a strip of yellow cardstock. i cut out my cork scallops using my MFT jumbo scallop die-namic steel die in my cuttlebug. this is a standard size, horizontal card base so the measurements are simple & it comes together quickly!
once the paper layers were created, i stamped the sentiment onto the main panel, added my little shell and sandcastle accents, and popped up Florence into a comfy spot using dimensionals.
this whole front panel was then attached to the easel card base using 1/2" scor-tape.
next i wound the twine around the entire card front, added a big wooden button and some fun summer charms (a flip flop & a sun) to a jump ring that i then threaded onto the twine. a simple knot tied it all into place. i was worried over time the charms & button might get too heavy so i hot glued the button down to ensure a good hold. the twine also adds a nice texture to the inside of the card since it wraps all the way around.

3.the inside of the card:

is a simple blue mat with a sweet sentiment added in black ink.
the bottom of the inside panel is the section of kraft paper stamped with the brown shells. to the kraft, i added a layer of yellow cardstock that i edge punched using my fiskar's punch.
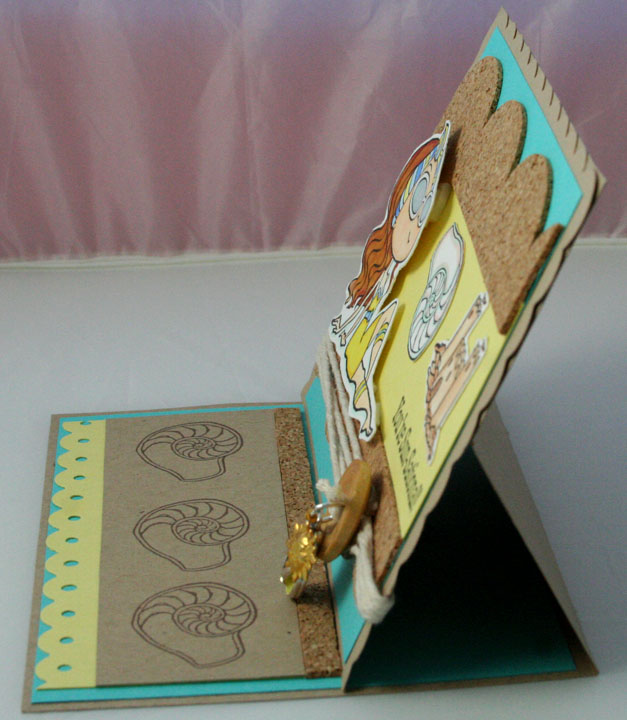
a thin strip of cork above the shells, provided just the right amount of height in order to help prop the card open when it's standing up- you could do this with a larger embellishment or even a few more layers of cardstock- anything that helps to keep it open will work great.

these pics will make this more clear:


here's the card closed & ready to go into an envelope:
click photo to enlarge


here's the card open, showing the full inside:
click photo to enlarge


here's a side view of the card standing open, propped up on the bottom inner layer:
click photo to enlarge


whew! it's much easier to show you than tell you LOL!
thanks for hanging in there with my long winded explanations.

this card is really way cool and if you've never made one- do yourself a favor and try it- it's sure to make you feel good and i can't wait to see how my sis-in-law likes it when she gets it in the mail...though i'm a little worried she's going to request a bunch of them for her friends ;)

thanks for looking!
{{GIANT HUGS}}
xo
-g
^o^