Showing posts with label stamps. Show all posts

Wednesday, January 25, 2012

MFT WSC Sketch55

please click images to enlarge


hi there everyone! MFT's Wednesday Stamp Club sketches are continuing this year! YAY!
here' s my card for sketch 55! hope you'll play along- these sketches are so awesome & really help inspire! there's also this great video posted by Joanne all about bow tying on cards- so way cool and so helpful! this sweet & simple valentine is for my daughter- hope she likes it! bbs! xo
^o^

card inside:

deets:
ink: memento tuxedo black, fired brick tim holtz distress ink
paper: fossil scalloped notecard (stash), bazzill white cardstock, pink lemonade cardstock (Pop-Tone brand), Making Memories dp (old line from stash)
accessories: MFT's layered heart dienamics, cb embossing folder, copic markers, TCP's cream seam binding, Jody's boosters

Monday, July 25, 2011

MFT WSC29-another great sketch!


please click image to enlarge

hi everyone! i had time to play this week with MFT's Wednesday Sketch Club! all the details can be found at this post on the MFT blog- check it out & play along- it's another awesome sketch!

i stamped the sweet PI girlie (Being Cute Is What I Do) 3 times to paper piece her- once on xpress it blending cardstock, again on some Basic Grey patterned paper to piece her bohemian-style shirt, and a final time on a stamped denim texture from MFT's Well Worn Greetings set to make her jeans!
she's colored with copics. i added a little tiny heidi swapp bling flower to her shirt too. i pierced some holes around the image before i mounted it to a double mat. the new file tab dienamic was perfect for my sentiment! i used the little open scallop strip die on some cork and the upsy-daisy die for a fab flower embellie! can ya tell that i love my dienamics?! i also jazzed up some cardstock scraps for this one using cuttlebug embossing folders.

anyway- it's such an awesome, easy sketch that i'm going to use again & again! you should totally go & save this one too!


deets:
stamps: MFT's Being Cute is What I Do (Pure Innocence line), MFT's Well Worn Greetings
ink: memento tuxedo black, CTMH Spring Iris (sentiment), tsukineko yellow dauber duo
paper: XPress-It blending cardstock, MFT cardstocks (Fossil, SnoCone, Hot Fudge), Basic Grey patterned paper (Out of Print 6x6 pad), MFT cork sheets (temp out of stock), fossil scalloped notecard (my stash from an old MFT kit)
accessories: copic markers, cuttle bug embossing folders (swiss dots, polka dots), heidi swapp mini bling flower, MFT dienamics (file tab, upsy-daisy, little open scallop strip)

thanks so much for looking!
{{GIANT HUGS}}
-g
^o^

Sunday, November 28, 2010

MFT Teasers Day 2


please click on the photo for a larger image!

hello & welcome to Day 2 of MFT Teasers!
There's so many awesome creations for you to check out-so after your visit, please head over to Kim's blog for the full list of participants!


Today i'm excited to share the newest upcoming MFT Flapper Doodles set,
Cheers to a New Year! Aren't they fun? These girls certainly know how to bring in the New Year in style! i just LOVE 'em! i thought they would totally love celebrating in classic MFT pink & black ;) The Decorative Doily and Faux Crochet Border Dienamics really helped to pull my designs together elegantly and quickly, and i just love how the set turned out!

here's a closer view:


here's the inside- i used another sentiment from the set:


details:
Stamps: MFT Cheers to a New Year (avail Dec 1)
Paper: vellum, pink and black card stocks, Basic Grey patterned paper(from the Basics white pad), Fancy Pants flocked overlay
Ink: Memento Tuxedo Black
Accessories: copic markers, spica glitter pens, MFT ribbon (retired), MFT swarvoski crystals, MFT decorative doily and faux crochet border dienamics, Jody's boosters, vellum adhesive.


thanks for looking!
{{GIANT HUGS}}
-g
^o^
PS- i highly recommend X Winery's 2009 Carneros Chardonnay- it's delightful!

Wednesday, September 29, 2010

Kraftin'Kimmie Challenge47


please click images to enlarge them!


Hello again!!
Kraftin' Kimmie's challenge this week is a fun color combo-orange, green & purple- perfect for more Halloweeny crafty goodness! here's the link to read all the details and join in!! i couldn't wait to ink up my new Pumpkin Miles stamp & play! in fact-i just love all the fun, new stamps at Kimmie's store-you gotta go check 'em out and have some stampy fun! YAY!

here's a closeup-these Miles images are so fun to color!
click photo to enlarge:


here's the card deets:
stamps: Kraftin' Kimmie Pumpkin Miles (illustrated by Steven Leary) inside sentiment is from Kraftin' Kimmie's Haunted House
ink: memento tuxedo black
paper: GinaK 80lb. pure luxury white cardstock, colored cardstocks & patterned papers (echo park) are from the awesome Fright Night project pantry kit (from Taylored Expressions)
accessories: copic markers, nesties, cuttlebug embossing folder, black scalloped note card (from an MFT kit, made by The Paper Cut), ribbon & rhinestones (also from the TE Fright Night kit), Jody's awesome boosters
Thanks so much for looking!
{{BIG HUGS}}
-g
^o^

Tuesday, September 28, 2010

MFTWSC092210-Boo Time!


please click images to enlarge them!


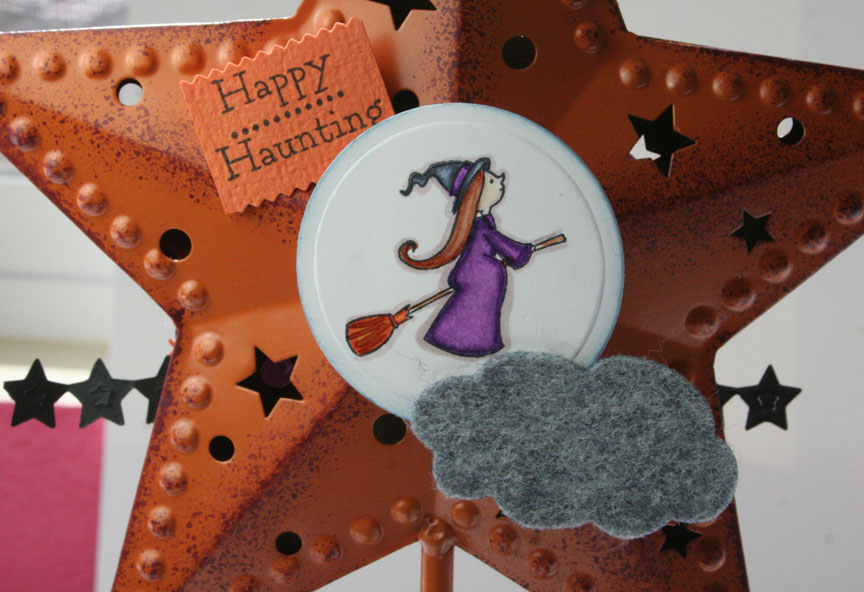
WooHoo! another week is flying by and this week's MFT Wednesday Stamp Club had another fun challenge! This week- it was to make a scene- find all the details here & play along!! we are in full halloween card & decor making time at my house- and it is fun FUN!

i picked up these metal stars at the local Target dollar spot not long ago & when the WSC challenge 'to make a scene' came up this week- it was a perfect opportunity to embellish one of these babies!!

i LOVE this new MFT set- Tiny Town Halloween- it is perfect for scene making & little treat bags!

here's some close ups & a look at all the dimension:
please click images to enlarge


details:
stamps: MFT Tiny Town Halloween

paper: Gina K 80lb pure luxury white cardstock, bazzill cardstocks (purple & orange) pp is cosmo cricket (matilda paper pad)

ink: memento tuxedo black, tim holtz distress ink in stormy sky

accessories: copic markers, nesties, cuttlebug embossing folder, MFT dienamics (cloud trio and star border), ribbons (are from the TE fright night project kit), MFT felt, Jody's awesome boosters, pinking scissors, best glue ever, wide purple ribbon is from my stash (roll bought at Michael's over a year ago LOL!)

thanks so much for looking! i so hope you'll play along too!!
{{GIANT HUGS}}
-g
^o^

ps- my cold has turned into full on tonsillitis- so i'm trying not to talk much as i'm super horse & scary sounding LOL! i haven't been to the gym for my morning cardio for 10 days now but it'll be there when i'm feeling better, right?!
i have to share a super sweet pic of my daughter looking especially cute & ready for her day today:

i LOVE it when she let's me give her piggytails but they never stay in for long, sigh! she totally LOVES her new halloween decoration too :)

Tuesday, September 21, 2010

MFT WSC9.15-Seeing Stars!


click images to enlarge

MFT has another awesome Wednesday Stamp Club challenge up this week- it's all about stars- find all the details in this post & play along! i've been sick since last week, but i had to play along with this fun theme!

here's a close up taken in the sun so the color's a little better:


i don't have the star nesties...yet ;) so i made my own stars in illustrator, printed, cut them & then traced onto cardstocks. the jpg's are below if you might need some stars too.
note to self- next time draw shapes in Make the Cut and have my cricut do the work for me- DOH!!


i had fun making my own patterned paper with the tiny T-Rex image from MFT's Wyatt and His Wagon- you can't help but make the 'rawr' noise each time you stamp him (hope it's not just me!!).

my MFT dies, cork, felt & adornments made embellishing this card easy and the dies always work great! i glued on a toothpick to turn the MFT banner die shape into a pennant flag!

i have a 7 year old nephew and a big-kid hubs ;) who would love this one- gonna have to flip a coin to see who gets it!

deets:
Stamps: MFT's Wyatt and His Wagon, the RAWR sentiment on the flag is from MFT's Little Loveosaurus
Ink: Memento tuxedo black, Memento Rich cocoa
Paper: MFT cardstocks in Jellybean Green, Sour Apple and Wild Cherry; GinaK 80lb white pure luxury, Basic Grey PP (basics white paper pad)
Accessories: copic markers, krylon gold leafing pen, MFT Die-Namics: Banner Day die, Jumbo Ric Rac Die and Star Border die. MFT princess pearls (black), MFT cork, MFT felt, dimensionals, colored pencil, toothpick, Best Ever white glue (temp sold out at MFT.)

Here's the JPG star files for you- right click the images & save them to your computer:
smaller stars for decorating:

card base shape:


thanks for looking- i'm off for more tea- cross your fingers that i don't lose my voice- it's been a rough few days already!
Please join in the WSC fun with us if you get a chance- i'd love to see your creations too!
{{GIANT HUGS}}
-g
^0^

EDIT: OOPS! so sorry, i forgot a look at the inside (told you i was under the weather!) here ya go:

Tuesday, August 31, 2010

Kindergarten Day 1-pics & projects


please click images to enlarge them


whew! it's been a while since i posted! so much has happened in the last few weeks- let's see if i can catch everyone up.
Aug 12-16th we were in Michigan for Grama's 90th birthday celebration! family friend and pastor Fr. Jim held a lovely mass for Grams on Saturday afternoon, followed by an amazing party & private feast at a local Italian restaurant. it was great to see everyone! Sadly, we could only stay a few short days so we could get back home and get prepared for school to start! thankfully, the Eastern time zone really helped us get a jump start on getting to sleep by 9!
Aug 23rd was a big day- it was the first day of school! we can't believe Mimi's starting Kindergarten this year!
here's another pic of our big 5 year old girl (& her birthday's coming up fast too!) with her Dad on her big day:


OK- so not long ago MFT released another adorable set called Emma with her backpack
One of MFT's amazing designers, Christina Fischer, made these ADORABLE projects for back to school!
i had some scraps of some of the same papers so i cased Christina's fun back-back tag & card and made a set for my Mimi:


here's the tag:


here's the card:


i think they turned out so sweet and Mimi loved them!
the uniform even matches one one of my daughter's- a blue plaid skort and a yellow polo! ca-ute right?!

here's a peek at the inside & the enve too:


deets:
Stamps: MFT's Emma with her backpack
MFT's banner day alphabet (for 'mimi' on tag)
Ink: Memento tuxedo black, tsukineko canary yellow ink dauber (accent on tag)
Paper: GinaK heavyweight pure luxury cardstock, MFT white scalloped notecard (card base), bazzill blue cardstock, October afternoon patterned papers (from the Boyfriend and Fly a Kite paper collections)
Accessories: Copic markers, nesties, MFT swarovski crystals, heidi swapp flower jewel, dimensionals, nametag holder (office depot)


thanks for looking! hope you're all having a great week as most of the school kids are back in session!
{{GIANT HUG}}
-g
^o^

Sunday, August 8, 2010

WSC8410-another fun sketch!


it's the first week of a new month (who can even believe it's August already?!) which means MFT's WSC has another great sketch challenge posted by Cindy & Frances-Yippeee! i LOVE their sketches! they are so inspiring i often find myself using them in tons of other projects- you gotta give them a try! You can find all the details this post on SCS. FUN as always!! i rotated & flipped this one to fit my image- hope you'll play along!

i just LOVE these new รก la mode cling stamps from MFT- this one is so sweet & sassy with her camera! i had some fun 12x12 strip scraps with the polaroid on it (cosmo cricket, the boyfriend line)- just screamed for this one! i kept this one super simple so the image could take the spotlight. this one will even fit in a regular A2 envelope- that's very rare for me LOL! the sketch pulled this one together in no time and i think it turned out way cute!

here's a closer look at the coloring and the inside:

click images to enlarge


i just love the sentiments included in this set too!

here's the deets:
stamps: MFT รก la modes Picture Perfect
ink: memento tuxedo black, catseye dark brown (edging around image), catseye lipstick red (edging around punched sentiment)
paper: MFT fossil scalloped notecard (base), ginaK pure luxury heavyweight cardstock, patterned papers are all cosmo cricket (the boyfriend line)
accessories: copic markers, 1.25" scalloped circle punch (EK success), dimensionals

in other news- dd was back at pediatrician this week for a bad case of swimmer's ear on the other side! our first 10 days back from vaca she was on amox and drops for her other ear- poor thing can't swim for ANOTHER full week (& this kiddo lives in the pool!) we'll be traveling to MI for Grams 90th birthday party next weekend and then back to school will be in full swing- we start full day kindergarten in 2 weeks!

thanks so much for looking!
hope you've had a great weekend!
{{GIANT HUGS}}
-g
^o^

Saturday, June 26, 2010

There She Goes Challenge-stair step card


click on image to enlarge it

hello everyone! i'm back with another fun challenge card! this time, it's for TSG60-a Stair Step card! this is another type of card that i'd never tried before! 2 in one week- WooHoo- how i love learning new things!

some of my very favorite clear stamp sets are from There She Goes- you HAVE to check them out (some faves are Loads of Fun, A Woman's Place, Domestic Goddess, Tastes Like Chicken- betcha totally burst out laughing) this time, i'm using the lovely What's Up Buttercup set


Beate at Splitcoast has another amazing tutorial on how to construct the stair step card base and her tutorials are so awesome with full photos & a complete video too- like she's in the room making it with you- just love 'em!

anyway- i kept it pretty simple & straightforward since this was my first attempt at this card and i really enjoyed it. these would be awesome at any dinner party- they can go from whimsical & funny to wedding elegant and i love anything someone can stand up on their desk for a bit and think of you for a bit after you send it- way cool!

deets:
STAMPS: What's Up Buttercup by There She Goes
PAPER: Banana Split and Snocone cardstocks by MFT, Brown and kraft cardstocks by Bazzill, MFT creme perfect paper panels, patterned paper by October Afternoon (Fly a Kite)
INK: Memento rich cocoa
ACCESSORIES: Canary Dauber by Tsukineko, 1 1/8" circle punch, nesties, EK Success daisy chain slim edge punch, Copic markers, Gold Copic spica, Clear star gelly roll pen by Sakura, dimensionals, heavy twine (hardware store)

other info:
images were all stamped in rich cocoa onto MFT creme paper panels & cut or punched out and adhered with dimensionals.

more pics:
close up of the glittery shine from the glitter pens:
please click photos to enlarge


the card opened from the side:
please click photos to enlarge


the csrd folded up ready for an envelope:
please click photos to enlarge


this is another card that i encourage you to try- it's fun and makes a very cool presentation!
thanks for looking!

in other news the hubs has successfully passed his blue belt test for jiu jitsu- he rolled for 3 hours with over 20 dudes straight! he is covered in brusies and mat burns & sore as heck, but we couldn't be prouder of him!!! he rocks the mat!

hope you're having a great weekend!
{{GIANT HUGS}}
-g
^o^

Sunday, June 20, 2010

some tags, a card & barnum's funundrum (lots-o-pics)


click images to enlarge


i have several things to share with you today!
one of my favorite crafty things to do is take a small little gift, wrap it, and add a quick tag. i especially like to surprise the little people in my life with these gifties, but it makes kids of all ages so happy to unwrap a little something- even if it's a .50c candy bar or a new box of crayons. people seem to enjoy the tags too. i always add enough ribbon so the tags can hang somewhere- a doorknob, a dresser drawer pull, over a chair back, etc. they are fun to make, and a great way to use up scraps, practice new techniques and coloring ideas- so everyone wins!
these are some tags i made the other day to surprise 2 special little boys i know- and what little boy (or girl) doesn't love some cute robots?!

Stamps: MFT Bunch of Bots and the teeny weeny heart on the top tag is from MFT's Love Machine sentiments from these sets too
Paper: Creative Cafe tags, MFT cream paper panels, MFT Robot digi paper
Ink: memento tuxedo black
Accessories copic markers, MFT dienamics (cloud trio die) nesties, pop dots, ribbon (michael's)
Other: wrapping paper is from target


up next is a card for a dear friend's daughter who recently graduated from high school. it's a 'girlie' version of the recent graduation card i had made for our little brother.
click images to enlarge

it's almost identical, except i used lots of bright yellow (her school color) a thicker twine and a big flower that i custom colored to match with copic markers. you NEED this set if you have any graduation events in your life- now or later! in fact, you NEED all 3 Fred Bear sets- 'cause he's so adorable!!
STAMPS: MFT Fred Bear Graduates
PAPERS: MFT paper panels, cardstocks (MFT banana split, bazzill), basic grey patterned paper (from june bug paper pad)
INK: memento tuxedo black
ACCESSORIES: copics, nesties, MFT dienamics large scallop, pop dots, MFT cork, MFT earth girl button, thick twine (home depot)
here's a look at the inside too:
click images to enlarge


the circus is in town this weekend too! here's a few pics from Barnum's Funundrum:
click images to enlarge


finally- sending very happy father's day wishes to all the awesome dad's out there! hope you're having a wonderful weekend!
thanks for visiting!
{{GIANT HUGS}}
-g
^o^

Friday, June 18, 2010

For Taylor

click image to enlarge:


two posts so close together? that hardly EVER happens around this blog!

my good friend Taylor is pregnant with her first daughter (due very soon- YAY!) she's a wonderful Mom to two other little boys (ages 5 and 2.5!) i made this cute card for her today to go along with a jumbo box of diapers, wipes and some other newborn items. even though it's very simple & straightforward,i really had fun making this one! i guess it's just anytime you think about a friend having a new baby, you just have to smile, ya know?!

stamps: MFT Baby Bump

paper: MFT fossil note cards, MFT perfect paper panels, pink, black and cream cardstocks, basic grey dp (basics white, and kioshi 6x6"paper pads), scrap of scenic route paper (black polka dot)

inks: memento tuxedo black, spun sugar distress ink

accessories: MFT dienamics (scallop scallop and jumbo scallop), MFT cork, MFT felt, copic markers, polka dot cuttlebug embossing folder, MFT ribbon, MFT mini pink safety pin (adornment), pink plastic pacifier charm (unknown manufacturer, was in my stash), dimenstional boosters (from Jody-these rock!)

some interesting notes:
the image was stamped several times. i altered the white dp with pink distress ink to color it, then i stamped the main image right onto it. WTG's legs & sidewalk were stamped onto a paper panel, colored with copics, cut out and pieced onto the dp image.
Her shirt and shopping bags were pieced from the other patterned papers.
i just love how cute it turned out- it's colorful and artsy & i dig it!
i fed the mini safety pin through the tiny pink plastic pacificer charm and pinned it right to the ribbon. it is such a cute touch- you should try pinning something on your next card!
i LOVE MFT's cork, felt & dienamics and i can't say it enough- i LOVE LOVE LOVE 'em!

the inside is very simple and has lots of room for me to write a note

to accompany the card, i packed a jumbo baby gift bag with a sweet, pink travel swing, a super soft teddy bear rattle blanket, some one piece pj's and onesies, a big box of diapers & a case of wipes too.
i can't wait until baby Gwen is here!!
thanks for looking!

if you're looking for my Yo-Heave-Ho pirate card post- please click here- i'm having some issues with Blogger today!
{{BIG HUGS}}
-g
^o^

Thursday, May 27, 2010

MFT WSC519 WaterBaby


click image to enlarge

hello everyone- it's been a while since i've posted here! i've been very sick with bad allergies and a terrible headcold for almost 3 weeks! feel like i might be turning the corner this morning- but it's windy and cold again today so we'll see how we do (please think good thoughts- it's been really awful!)

MFT's WSC for last week was to watercolor an image- i'd never done that before (other than played a little with some pencils and blender pen- but that's not a water brush!) coincidentally, i had also ordered some ingredients to start experimenting with homemade bath bombs. the idea for a cute bath set hit me the moment i saw my brand new Pure Innocence cutie from MFT- this one is Lather Rinse Repeat- isn't she just adorable in her tub of bubbles?! you gotta love that sweet rubber ducky too! ca-ute!

all i had on hand was a Strathmore watercolor pad so i stamped the image on a piece of that using Brilliance graphite black ink. i used clear embossing powder over the ink and heat set it well to ensure my watercolors wouldn't run the image. it really worked great! i made a few of these to have some extras on hand.

i had a set of Winsor & Newton watercolors that i got on sale at dick blick years ago (the little tiny half cakes in a box-it was around $10 for the set and comes with mixing wells and a brush) i dug those out & got to work mixing & coloring. i have to say i was hesitant to put the first swatches of color down, but then i just let go & started to play and not worry about it (you can always stamp off and emboss more!) the process was relaxing and fun and it forced me not to rush things. very zen. very cool. totally give it a go!

here's a closer view:

click image to enlarge


this card is straightforward but some things to note:
i used a ticket corner punch (SU) on the image & on the mat.
patterned paper is by Basic Grey (kioshi line)
i popped up the little ducky in his puddle that i had painted separately.
i used an MFT Fossil note card for the base, and some MFT glittered garnishes for embellies. Ribbon is from MFT too.

here's the inside:
just a simple white emboss of the sentiment.

click image to enlarge

the bath bomb bag is an MFT gusset bag
i cut a label with my nesties, and stamped the same PI image using a light brown ink for a lightly colored 'watermark' effect:

click image to enlarge

the back of the label has some instructions and the sweet ducky image from the same stamp set.
the instructions i simply typed up (i used the Cheri font it's a free download) and printed out & added to the bag:


click image to enlarge

if you're looking for supplies or starter kits, try Bramble Berry

Bath Bomb Recipe
ingredients:
1 part citric acid
2 parts baking soda
fragrance if desired (i used an oil blend)
colorant if desired (i used lilac la bomb colorant- it's an fd&c based dye in a glycerin base)
witch hazel in a spray bottle (you need several spritzes)
something to mold with- ice cube trays, plastic easter eggs, plastic ornament molds or soap/candle making molds, sand molds- anything!

directions:
mix the citric acid & baking soda thoroughly in a large bowl.
sprinkle fragrance (i used .5oz for 1 lb. citric acid/2 lb. baking soda-see note below*) over dry ingredients and mix well.
add colorant and mix well (to your liking- i used a quarter of the small bottle of colarant) again.

here's the tricky part:
while stirring the mixture spritz some witch hazel over the bowl- like 6 pumps or so and incorporate it well. you don't want to dump in a bunch of liquid or it will start fizzing on you. just a light spritz at a time, 6 times in a row. i needed about 4 sets of short pumps to get the mixture to clump together & hold it's shape in my hand- it will vary based on your temp/humidity. basically if you pick it up and can mold it in your hand like damp beach sand you're done- start packing it into your mold right away. over fill the mold, press it together (if using the ball ornament mold) let it sit a minute or two, then release the mold (one side at a time on the ball mold- gently tap & lift off one end of the mold, then the other) set to dry on some wax paper for about 2-3 hours.
enjoy!

* fragrance note: these were HIGHLY scented bombs- truth is they came out too strong for us and too big! i've been breaking them into quarters & using just a small piece at a time! still works great- just don't get the pieces wet when you break them up!

also- i don't recommend using these for young kids- fragrance free ones would be ok, but lots of fragrance or certain types of oils can cause some stinging in little eyes or in any little scrapes or cuts!

whew- that was a bit longwinded eh?! lol! thanks for hanging in there!
need to take more meds & make a quick thank you note before school is out today! hope to be back soon!
{{GIANT HUGS}}
^o^
-g